
Some time ago I setup a GitLab-ce in a VM on one of my dedi boxes. Over time I fully switched from GitHub to this selfhosted GitLab instance and started using GitLab's CI/CD system and I am using it like crazy ever since.
Up until now, I've had a few extra VMs running on CentOS7 with docker runners, but then I had to setup runners that run in clean VMs and not docker containers, because containers are meant to have one service running in them, it is possible to run systemd containers, but I wanted to stay on the clean and smooth side - so I sticked with VMs... and here is where I hit the wall 🧱 - and it was a hard one. I wasted multiple days trying to figure out how to setup the runners which met two simple requirements: job has to be executed in the VM and the VM has to be reset back to its original state after each job.
I approached the problem in many ways, but I wasn't successful - I posted a thread asking for help on GitLab's forums, but nothing - until I went on GitLab's IRC channel and in less than one minute after posting the message another member nicknamed "tabakhase" answered. After running back and forth about how the needed setup could be achieved, he came up with a simple, slick and stable solution.

# The solution that I needed, but didn't deserve
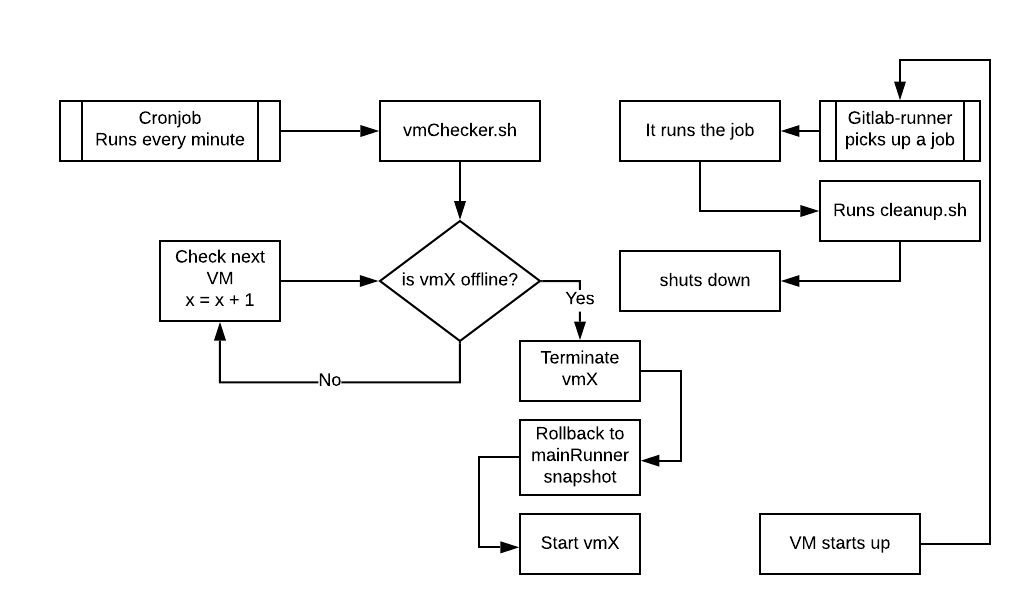
The finished solution works as follows:
- Gitlab runner on a VM picks up a job and it runs through it
- When finished, it runs the cleanup script which shuts the VM down
- The checked script on our host machine detects that the VM is offline, it terminates the VM, rolls back to main snapshot and starts it back up.
- The cycle repeats.
# Step 1 - Setting up the host
First of all, you need to setup the host if you haven't yet.
I am using Proxmox (which uses KVM), but you can use any other virtualization environment that runs on linux and has a CLI.
# Step 2 - Setting up the VMs
After installing the prefered linux OS on your VM update it, install gitlab-runner, register a new runner and select the "custom" executor.
After registering a new runner edit the runner config file to look as the following one. If you want, you can also setup a cache server - you can read here how to set it up.
!! Don't forget to replace gitlab.hostname.tld with your actual gitlab address, leave the token value as it is.
concurrent = 1
check_interval = 0

[session_server]
  session_timeout = 1800

[[runners]]
  name = "runnerX.gitlab.hostname.tld"
  url = "https://gitlab.hostname.tld/"
  token = "RUNNER-TOKEN"
  executor = "custom"
  builds_dir = "/builds"
  cache_dir = "/cache"
  [runners.custom_build_dir]
  [runners.cache]
    [runners.cache.s3]
    [runners.cache.gcs]
  [runners.custom]
    run_exec = "/usr/bin/bash"
    cleanup_exec = "poweroff"
This setup is very similar to the shell executor - the key difference is cleanup_exec = "poweroff", which shuts down the VM.
# Step 2.1 - Ubuntu-specific setup (edit: 16/04/2020)
After using this setup for some time I started getting some issues with Ubuntu-based runners; if the script has any apt-get update|upgrade|install|... in the first few scripts, the script fails to get apt lock and the jobs fails. After searching around a little bit I found the issue; auto-updater.
You need to change the following files:
APT::Periodic::Update-Package-Lists "0";
APT::Periodic::Download-Upgradeable-Packages "0";
APT::Periodic::AutocleanInterval "0";
APT::Periodic::Update-Package-Lists "0";
APT::Periodic::Unattended-Upgrade "0";# Step 3 - Creating a snapshot
This will be the state that your VM will be rolled back to after every job. Make sure you set everything up before you create the snapshot.
Shutdown the virtual machine and create a new snapshot by running the following command. Replace "VMID" with the ID of the virtual machine.
You can also do this via user interface, if your setup has one.
qm rollback VMID mainRunner# Step 2-3 (extra) Multiple runners
In most cases, a CI pipeline has multiple jobs that require different environments, so you probably need multiple VMs, in which case you just repeat step2 and step3 for each VM.
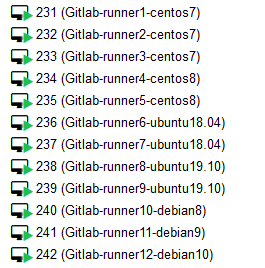
!! Make sure you have all runners VMs with ordered IDs (important for the checker script).
# Step 4 - Creating the checker script on the hypervisor
Now we go back to your host machine (the hypervisor) and finish with the final few steps. First of all, we create the setup script. Use the first one, if you have multiple runner VMs and the second one if you have only one.
Do not forget to edit the VM IDs. As mentioned in Step 2-3, you have to have all runner VMs in an order without any other VMs between them.
#!/bin/bash

echo "" > /root/checkRunnerMachines.log
datenow=$(date)
echo "!!! Starting runner check @ $datenow..." >> /root/checkRunnerMachines.log

echo -e "Host *\n\tStrictHostKeyChecking no\n\n" > ~/.ssh/config

# EDIT THE MIN AND MAX VM ID
for i in {231..242}
do
  vmstatus=$(qm status $i)

  echo "!!! Testing runner VM $i..." >> /root/checkRunnerMachines.log
  if [[ "$vmstatus" == *"stopped"* ]]; then
    echo "!!! Runner VM $i is stopped..." >> /root/checkRunnerMachines.log
    echo "!!! Reverting runner VM $i to main snapshot ..." >> /root/checkRunnerMachines.log
    $(qm rollback $i mainRunner) >> /root/checkRunnerMachines.log
    echo "!!! Starting runner VM $i ..." >> /root/checkRunnerMachines.log
    $(qm start $i) >> /root/checkRunnerMachines.log
  fi

done
echo "!!! END" >> /root/checkRunnerMachines.log
#!/bin/bash
echo "" > /root/checkRunnerMachines.log
datenow=$(date)
echo "!!! Starting runner check @ $datenow..." >> /root/checkRunnerMachines.log
echo -e "Host *\n\tStrictHostKeyChecking no\n\n" > ~/.ssh/config
# EDIT THE RUNNER VM ID
i=231
vmstatus=$(qm status $i)
echo "!!! Testing runner VM $i..." >> /root/checkRunnerMachines.log
if [[ "$vmstatus" == *"stopped"* ]]; then
echo "!!! Runner VM $i is stopped..." >> /root/checkRunnerMachines.log
echo "!!! Reverting runner VM $i to main snapshot ..." >> /root/checkRunnerMachines.log
$(qm rollback $i mainRunner) >> /root/checkRunnerMachines.log
echo "!!! Starting runner VM $i ..." >> /root/checkRunnerMachines.log
$(qm start $i) >> /root/checkRunnerMachines.log
fi
echo "!!! END" >> /root/checkRunnerMachines.log# Step 5 - Periodical runner VM checking
You will need crontab package installed which will be used to run the "vm checker" script from step 4 every minute (or more, depending on the number of runner VMs you have).
# Step 5.1 - Installing crontab
apt-get install cron -yyum install cronie -y# Step 5.2 - Setting up the crontab config
Now that we have crontab installed, we just need to setup the config and we're done! Run contab -e in the terminal and the crontab editor will show up.
You might need to pick the text editor you want to use first, in which case the following menu will show up. Pick your favourite editor, type in its number and press enter to confirm. I will pick vim, since I prefer it over nano.
root@runner10:~# crontab -e
no crontab for root - using an empty one

Select an editor.  To change later, run 'select-editor'.
  1. /bin/nano        <---- easiest
  2. /usr/bin/vim.tiny

Choose 1-2 [1]:
Now that we're in the crontab config, you might see the following text. Some distributions have it, some don't - it does not really matter.
# Edit this file to introduce tasks to be run by cron.
#
# Each task to run has to be defined through a single line
# indicating with different fields when the task will be run
# and what command to run for the task
#
# To define the time you can provide concrete values for
# minute (m), hour (h), day of month (dom), month (mon),
# and day of week (dow) or use '*' in these fields (for 'any').#
# Notice that tasks will be started based on the cron's system
# daemon's notion of time and timezones.
#
# Output of the crontab jobs (including errors) is sent through
# email to the user the crontab file belongs to (unless redirected).
#
# For example, you can run a backup of all your user accounts
# at 5 a.m every week with:
# 0 5 * * 1 tar -zcf /var/backups/home.tgz /home/
#
# For more information see the manual pages of crontab(5) and cron(8)
#
# m h  dom mon dow   command
At the very bottom of the file (or in the first line, if your config is empty), type the following in - which will tell crontab to run the /root/checkRunnerMachines.sh script every minute - and save the config.
* * * * * /root/checkRunnerMachines.shIf you have more than 6 VMs, you should change this to the following.
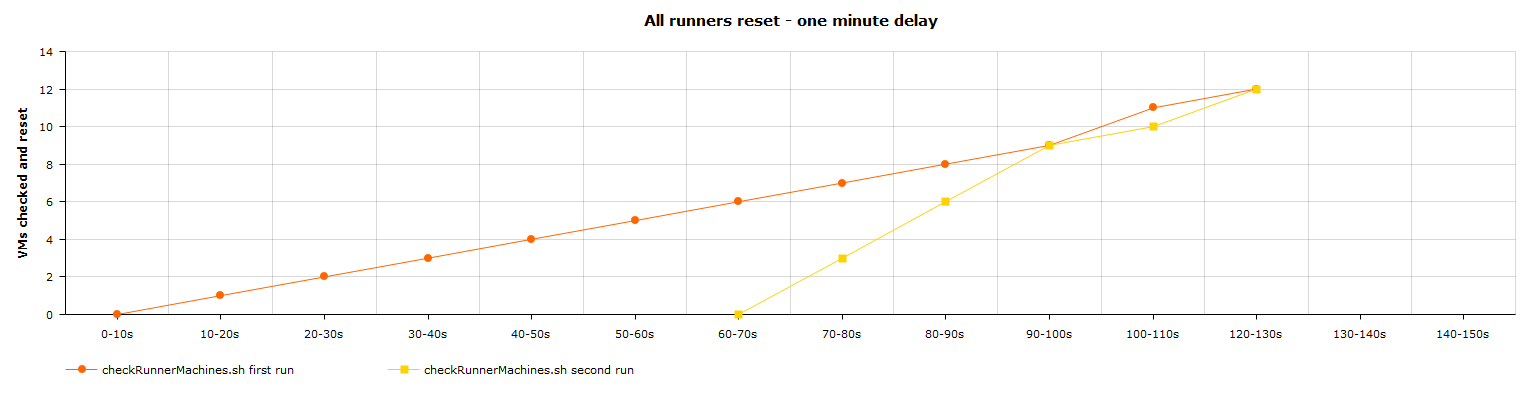
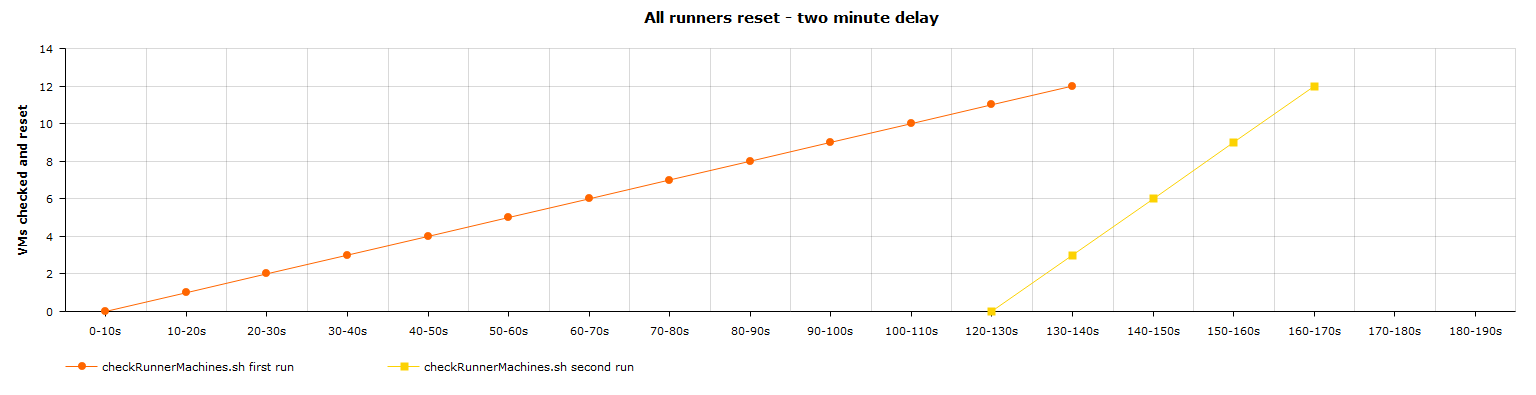
*/2 * * * * /root/checkRunnerMachines.shThis tells crontab to run the script every 2 minutes, so in case that all runners have to be reset, the second run of the script doesn't catch the first run of it.
You can look at the following two graphs that represent that (un)wanted situation;
# Step 6 - Confirming that our setup works as intended
Now that we have everything set up, startup the runner VMs if you haven't yet and create a testing CI job that will be picked up by your runners that you setup in step 2 or step 2-3.
After the job finishes, the runner will run the cleanup_exec command, which will run the poweroff command and shutdown the VM. After that, the checker script that we setup in step 4 will check the VM, and since the VM will be offline, the script will roll it back to your snapshot that you created in step 3 and start it back up and the cycle repeats.
# The end
Now you have your very own runners with your predefined environments setup. You can always create or remove the already existing ones. You can also set this up on basically eny environment; be it KVM/qemu, libvirt - I belive you can also set it up with HyperV; you would have to refactor the scripts to work on PowerShell, but at the end of the day, the most important thing you can take from this article is the idea of how the whole setup works - everything else is relative to the required environment.
I hope I've helped you, or at least improved the current solution you're using right now.